Introduce delay between printk (kernel messages) at boot

If you’re developing into the linux kernel but your system is crashing at boot, the boot_delay parameter may be usefull. If you added printk messages to see what happened just before, you may use the boot_delay=XXX options to add XXX milliseconds between each printk, and therefore allow you to see each messages if the messages pass through quickly.

To add this parameter, type “e” while the good entry is highlighted in the grub menu bootloader, and add boot_delay=XXX at the end of the line starting with “linux=”.

This is the “quick” solution. Other posts in this blog allows you to find other solution to make the console go through a serial link in a VM for instance.

Get a map (dictionnary) of arguments->value from an URI in Android with any API Level requirements

If someone wants to use the URI class to parse an URL in Android, and get the given parameters the normal way to do it is :

String url = "http://www.example.com/?argument=value&argument2=value2&...";
Uri uri = Uri.parse(url);

//To get the value of known parameters
String argument = uri.getQueryParameter("argument");
String argument2 = uri.getQueryParameter("argument2");
...

//To look at all parameters if you don't know what you're waiting for
for (String key : uri.getQueryParameterNames()) {
   String value = uri.getQueryParameter(key);
   //Do something with value  key, like using a switch/case
}


The problem with the first method is that :

  • You need to know the arguments, and you cannot check if there is “unknow” arguments, like a malicious client trying to pass “include=X”
  • The query part of the URI is parsed each time you call setQueryParameter from the beginning !

The problem with the second method  is that :

  • When you call getQueryParameterNames() the whole query is parsed once
  • The query part of the URI is parsed each time you call setQueryParameter from the beginning !
  • getQueryParameterNames() is only available starting with Android 3.0 (API Level 11)

So I wrote the code below, which gives you a map of argument->value in one reading. You can then call any map-related function like containsKey(key) to know if an argument is in the URL, entrySet() to iterate through all argument/value, keySet() to get all the arguments, and values() to get all values. This only parse the URL once and is much more convenient. This code is in distributed in any GPL variant, take the one you prefer.

	/**
	 * Return a map of argument->value from a query in a URI
	 * @param uri The URI
	 */
	private Map<String,String> getQueryParameter(Uri uri) {
	    if (uri.isOpaque()) {
	    	return Collections.emptyMap();
	    }

	    String query = uri.getEncodedQuery();
	    if (query == null) {
	        return Collections.emptyMap();
	    }

	    Map<String,String> parameters = new LinkedHashMap<String,String>();
	    int start = 0;
	    do {
	        int next = query.indexOf('&', start);
	        int end = (next == -1) ? query.length() : next;

	        int separator = query.indexOf('=', start);
	        if (separator > end || separator == -1) {
	            separator = end;
	        }

	        String name = query.substring(start, separator);
	        String value;
	        if (separator < end)
	        	value = query.substring(separator + 1, end);
	        else
	        	value = "";
	        
	        parameters.put(Uri.decode(name),Uri.decode(value));

	        // Move start to end of name.
	        start = end + 1;
	    } while (start < query.length());

	    return Collections.unmodifiableMap(parameters);
	}

PIC Domotic station

I use this Microchip’s PIC program made in C to control my domotic system for quite some time now, and I think it’s ready to be published.

Below is the readme file, to read the last version, directly go to :

https://github.com/tbarbette/picdomotic

PIC Domotic station


PIC program for a domotic station controlling two temperature sensors, multiple relay, a USB port (for power only) and connected to a PC using UART to receive its instructions.

It uses a PIC18F23K20 but should work on most of them. The PC sends simple commandes through /dev/ttyUSB0 like “A 32” to enable the device 32, or “E 32” to disable it. “T” to get temperature, … See the source code in main.c.

This is MPLAB X IDE project. The only usefull file is in fact main.c, the rest is auto-generated, but I include them if someone would want to directly program the binaries, for example.

Technology used

If you’re looking for sample code, you may find here how to :

  • Use the UART to communicate with a PC (UART is connected to a “uart usb” module very cheaped that you can find on ebay for example) .
  • Use the watchdog timer to ensure a device reset if something goes wrong
  • Use Brown-out to jump to do an interrupt and do “something” (blink in my case) if the voltage goes below some threshold
  • Use the ADC to read the temperature given by two LM35
  • Read/write to eeprom
  • Control a 5V relay board with a 3.3V relay board using NPN Transistors (when I’ll add the schematic though)

The python script used to manage the PIC controller is available athttps://github.com/tbarbette/monitoring/blob/master/scripts/relay.py and a small HTTP server allowing you to remotely control it is available athttps://github.com/tbarbette/monitoring/blob/master/scripts/server.py

Enable Wifi N access point with hostapd

I use an odroid (a rasberry-pi like mini-pc but more powerfull) as a Wifi access point for my smartphone and my camera since quite a long time. I forgot that my USB Wifi dongle was compatible with Wifi N (only on 2.4Ghz), so my hostapd config file was :

[code]interface=wlan3
ssid=Barbette-Chambre
hw_mode=g
channel=11
bridge=br0
wpa=2
wpa_passphrase=YOURPASSPHRASE
wpa_key_mgmt=WPA-PSK
wpa_pairwise=CCMP
rsn_pairwise=CCMP
wpa_ptk_rekey=600[/code]

Here is the speed result with iperf :

[ 4] local 10.0.0.44 port 5001 connected with 10.0.0.175 port 48727
[ ID] Interval Transfer Bandwidth
[ 4] 0.0-10.2 sec 18.4 MBytes 15.1 Mbits/sec

Normaly, this should be 56Mbits/s, but we know wifi is crap…

And to enable Wifi N :

[code]

interface=wlan3
ssid=Barbette-Chambre
hw_mode=g   #Yes, this is not an error. Wifi N builds on top of G 😉
channel=11
bridge=br0
ieee80211n=1
wmm_enabled=1
country_code=BE
ht_capab=[HT20][HT40][SHORT-GI-20][SHORT-GI-40] ieee80211d=1
wpa=2
wpa_passphrase=YOURPASSPHRASE
wpa_key_mgmt=WPA-PSK
wpa_pairwise=CCMP
rsn_pairwise=CCMP
wpa_ptk_rekey=600[/code]


And the speed result is now :

[ 4] local 10.0.0.44 port 5001 connected with 10.0.0.175 port 48754
[ 4] 0.0-10.1 sec 30.6 MBytes 25.4 Mbits/sec

Better, but still not the 150Mbits/s of wifi N… But it’s better !

Limit rate of mail sent by motion detection daemon (motiond) for webcam surveillance

Maybe you use the “on_picture_save” to send yourself an e-mail with motiond when your webcam detect an  intruder. But when someone enters, you’ll receive a lot of pictures. And if it was just you forgetting to stop the detection before entering, your smartphone will become a christmas tree for nothing…

I just published my last program “limitrate” on Github :

https://github.com/tbarbette/limitrate

This programs allows you to limit the rate of launching a certain command. Instead of launching

/usr/bin/program argument1 argument2

call :

limitrate 30 “/usr/bin/program % argument2” argument1

To launch only this command at maximum once every 30 seconds. If you call multiple times the last line in 30 seconds, limitrate will run the command only after 30 seconds replacing the “%” by the concatenation of all “argument 1”. For example to send an alert e-mail containing files (for example webcam picture) at max every 30 seconds :

10:24:30 : limitrate 30 "echo \"Alert!\" | mailx % destination@mail.com" "-A /path/to/file1"
--> Send a mail with file1
10:24:32 : limitrate 30 "echo \"Alert!\" | mailx % destination@mail.com" "-A /path/to/file2"
10:24:38 : limitrate 30 "echo \"Alert!\" | mailx % destination@mail.com" "-A /path/to/file3"
10:24:41 : limitrate 30 "echo \"Alert!\" | mailx % destination@mail.com" "-A /path/to/file4"
10:25:05 : limitrate 30 "echo \"Alert!\" | mailx % destination@mail.com" "-A /path/to/file5"
--> Send a mail with file 2,3,4 and 5

Example configuration for motion detection daemon (Camera surveillance) :

on_picture_save /usr/local/bin/limitrate 15 “echo \”See attachment below.\” | mailx -s ‘Motion in the saloon !’ %destination@tombarbette.be” “-A %f”

When an intrusion is detected, you’ll receive a first e-mail with one image. 15 seconds later you’ll receive all the new images in only one mail, and so on.

Making Tilera TileMDE work on Debian 7 with Kernel 3.14

This review how to install Tilera MDE, with the slight modifications to support recent kernel and the debian environment. Our device is a TILEncore-Gx36

Edit : with MDE 4.3.2, the patch isn’t necessary anymore. You may use ./tilera-compile –gpl-license to be able to go through compilation

Install & Unpack

  • cd /opt/
  • Extract the primary tareball with sudo tar -xvf /home/tom/TileraMDE-4.3.0.178115_tilegx.tar
  • Run “unpack”  sudo ./TileraMDE-4.3.0.178115/tilegx/unpack
  • (optional instead of the last point) unpack the full tarball with sudo ./TileraMDE-4.3.0.178115/tilegx/unpack /PATH_TO/TileraMDE-4.3.0.178115_tilegx_tile_full.tar.xz
  • We’ll keep the Tilera MDE’s root on /opt/tilera, so move it there with sudo mv ./TileraMDE-4.3.0.178115/tilegx/ /opt/tilera && cd /opt/tilera

Setup environment

You’ve got to setup some environment variables. One way to do it is to add at the bottom of your ~/.bashrc file :

TILERA_ROOT=”/opt/tilera”;
PATH=”/opt/tilera/bin:$PATH”
export TILERA_ROOT PATH;

Compile and fail…

You’ve got to compile the Tilera module :

  • cd /opt/tilera/lib/modules/
  • Normally you would do “./tilepci-compile  –tilera-license”
  • Then “./tilepci intall”

But that would fail because :

  • It rely on redhat tools like chkconfig
  • It will compile a module not compatible with kernel 3.0+

You can do it anyway to extract a new folder for your current kernel, in my case “3.14-2-amd64-x86_64”

Apply the patch

So we’ll use my updated version of Sylvain Martin’s patch available here ( tom-fixes-3.14 ):

Warning : The patch is untested for many features (mostly related to /proc), but works with the stantard things you’ll want to do… Access the tilera, use tile-monitor, … It’s provided without any warranty.

  • rm -rf 3.14-2-amd64-x86_64
  • cp -rf tilera_src 3.14-2-amd64-x86_64
  • cd 3.14-2-amd64-x86_64/pcie
  • Apply the patch with patch -p1 < /PATH_TO/tom-fixes-3.14.txt
  • make INSTALL_PATH=/opt/tilera/lib/modules/3.14-2-amd64-x86_64

Install

tilepci-install will want “chkconfig” which is a redhat tool. I provide a simple wrapper here : https://github.com/tbarbette/chkconfigwrapper/blob/master/chkconfig , you just have to copy it in /usr/sbin/ and launch ./tilepci-install


If you have any comment or can provide any help, do not hesitate to comment !

ZSH : Open terminal where you left, for each session

There is some snippets for ZSH configuration which allow you to re-open the session in the folder where it was last closed available on the web. The problem is that you often launch 3 sessions at the same time, work on them and then quit/reboot/loose SSH connections/… So you will re-log 3 sessions which will start in the same last opened folder.

I propose a version allowing to keep the last folder per-session. Each ZSH session receive a number and write the current folder in a per-session file. When you open a new session it opens the file number associated to the session number.


Add somewhere in .zshrc :

[code]mkdir -p ~/.cwd/
session_num=`pgrep zsh | wc -l`
function cd() {
builtin cd “$@”;
echo “$PWD” > ~/.cwd/$session_num
echo “$PWD” > ~/.cwd/last
}
export cd
function cwd() {
if [ -e ~/.cwd/$session_num ] ; then
cd “$(cat ~/.cwd/$session_num)”
else
cd “$(cat ~/.cwd/last)”
fi
echo “This is session #$session_num”
}[/code]

And at the bottom of the file :

[code]cwd[/code]


Installing Spotify 9.10 (may 20), 9.11 (july 2) on fedora 20 64 bits

UPDATE : Tested for 9.11 on July 2


Remove any old version of spotify :

yum remove “*spotify*”

rm -rf /usr/local/share/spotify*


Remove any configuration file of the last spotify version :

rm -rf /home/$USER/.config/spotify

rm -rf /home/$USER/.cache/spotify


Download the debian package at http://repository.spotify.com/pool/non-free/s/spotify/spotify-client_0.9.10.17.g4129e1c.78-1_amd64.deb  http://repository.spotify.com/pool/non-free/s/spotify/spotify-client_0.9.11.26.g995ec04.78-1_amd64.deb:

wget http://repository.spotify.com/pool/non-free/s/spotify/spotify-client_0.9.11.26.g995ec04.78-1_amd64.deb


Install alien to convert the deb to RPM :

sudo yum install alien


Convert the deb to RPM with alien :

fakeroot alien -r spotify-client_0.9.10.17.g4129e1c.78-1_amd64.deb


Install the rpm :

sudo rpm -ivh –nodeps –force spotify-client-0.9.10.17.g4129e1c.78-2.x86_64.rpm


You will very probably have problems of dependencies to old libraries when launching spotify, like for libssl.so.1.0.0 , libudev.so.0 and libcrypto.so.1.0.0, I made a tarball with them.


Download oldlibs.tar :

wget https://www.tombarbette.be/wp-content/uploads/2014/05/oldlibs.tar.gz


Untar them :

tar -zxvf oldlibs.tar.gz


Copy them to /usr/lib64 :

cp -rf oldlibs/* /usr/lib64/


Remove the tarball :

rm -rf oldlibs*


If you don’t have any shorcut to launch spotify, copy the desktop entry :

cp -rf /opt/spotify/spotify-client/spotify.desktop /usr/share/applications/


If when you type “spotify” it doesn’t launch anything (and say this command is not found) :

sudo ln -s /opt/spotify/spotify-client/spotify /usr/bin/spotify

HTop

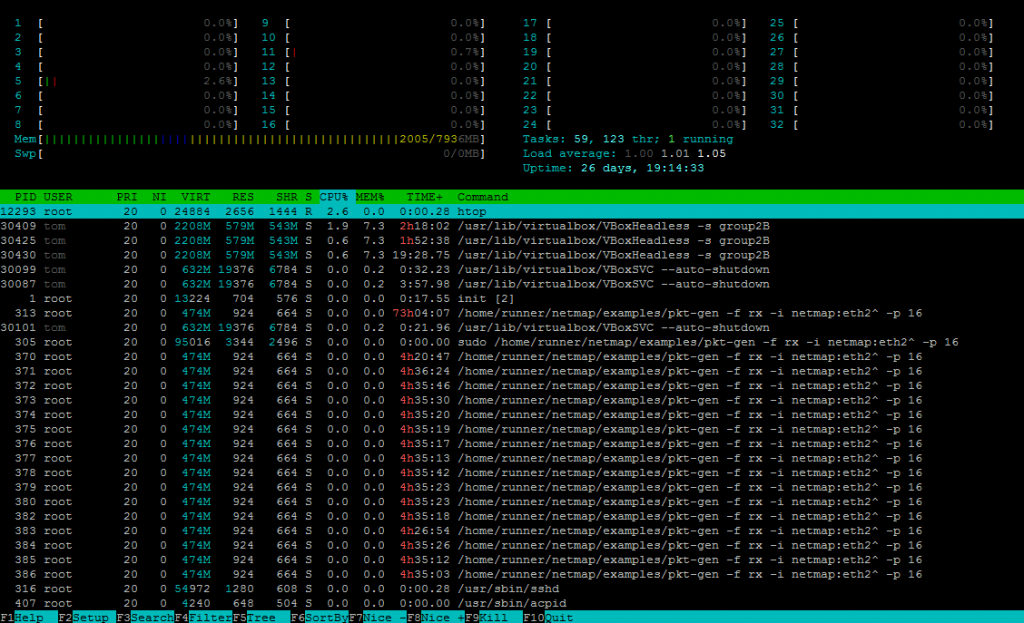
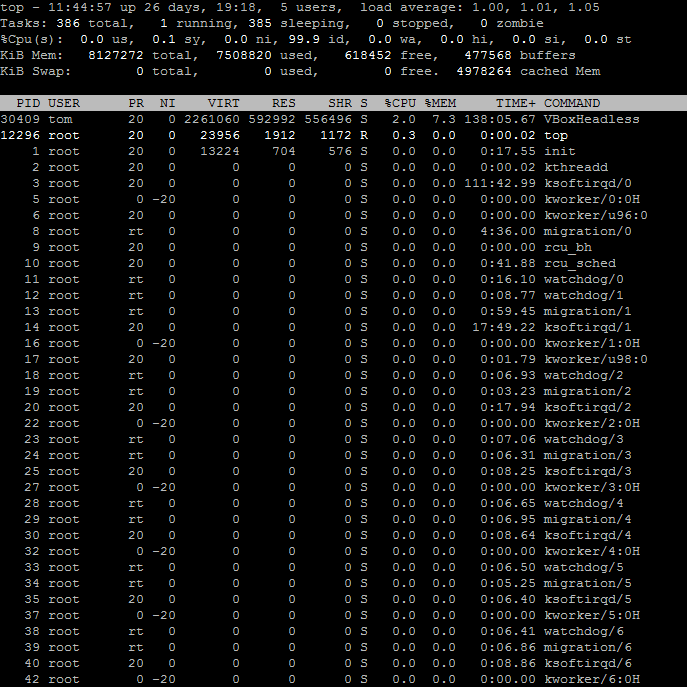
Maybe you already know the program “top”, “htop” is its enhanced version. And is very usefull to see how your systems handle its load and where is the load.


htop


You’ve got your CPUs load per core on top. Here I’ve got two processors with 8 cores each, and having hyperthreading activated, so 32 logical cores. The part in green is the percentage of time spent in your programs, and the read is the percentage of time spent in kernel. You also have the memory usage and programs.


top

Top – Remember…

Post it – What to save when reinstalling a server

More a post-it for myself, what to save when formatting or doing a major upgrade of my linux servers.


– database SQL – Saving /var/lib/mysql is possible but you’ll have to change some maintenance passwords. The easiest is to export your databases with the export function of phpmyadmin or with mysqldump.
– /var/svn – If you have an SVN server
– /var/www – Websites
– /etc – Configuration. Do not re-apply everything ! Choose only some config files for example :

  • /etc/dhcp/dhcpd.conf – Dhcp server config file
  • /etc/php/php.ini (can change according to linux distributions) – Php configuration
  • /etc/apache/sites-enbabled – Apache websites
  • /etc/apache/apache2.conf – Apache config
  • /etc/passwd /etc/shadow /etc/group – Users, groups, and passwords. But I may be a good idea to force everyone to change passwords at the same time, and to clean…
  • And many many mores…

– /home – If you want to keep user data. You should not have to save that when re-formatting your system because /home should always be another partition than the system “/” partition.
– ~/public_html – If not saving the homes, saves your local websites…


Any other ideas?