Our latest paper “Cheetah”, a load balancer that guarantees per-connection-consistency

Cheetah is a new load balancer that solves the challenge of remembering which connection was sent to which server without the traditional trade off between uniform load balancing and efficiency. Cheetah is up to 5 times faster than stateful load balancers and can support advanced balancing mechanisms that reduce the flow completion time by a factor of 2 to 3x without breaking connections, even while adding and removing servers.

More information at https://www.usenix.org/conference/nsdi20/presentation/barbette.

Our new paper RSS++: load and state-aware receive side scaling

I’m delighted to announce the publication of our latest paper titled “RSS++: load and state-aware receive side scaling” at CoNEXT’19.

Abstract

While the current literature typically focuses on load-balancing among multiple servers, in this paper, we demonstrate the importance of load-balancing within a single machine (potentially with hundreds of CPU cores). In this context, we propose a new load-balancing technique (RSS++) that dynamically modifies the receive side scaling (RSS) indirection table to spread the load across the CPU cores in a more optimal way. RSS++ incurs up to 14x lower 95th percentile tail latency and orders of magnitude fewer packet drops compared to RSS under high CPU utilization. RSS++ allows higher CPU utilization and dynamic scaling of the number of allocated CPU cores to accommodate the input load while avoiding the typical 25% over-provisioning.

RSS++ has been implemented for both (i) DPDK and (ii) the Linux kernel. Additionally, we implement a new state migration technique which facilitates sharding and reduces contention between CPU cores accessing per-flow data. RSS++ keeps the flow-state by groups that can be migrated at once, leading to a 20% higher efficiency than a state of the art shared flow table.

Paper ; Video ; Slides

Do HUAWEI CloudEngine switches support OpenFlow?

No, no and no.

Despite what the ONF says (https://www.opennetworking.org/product-registry/) it is not. Huawei’s OpenFlow implementation is actually broken. The very first  HELLO OpenFlow message is broken. It reports support for OpenFlow 1.4 in the HELLO message, but the rest of the message is absolutely not structured as defined in the standard.

After contacting all parties, it is clear that nobody will move about that, especially HUAWEI which wants to sell the Agile controller for a high price. It would appear that an old firmware, announcing OpenFlow 1.3 was compliant at the certification time but only if using an old software compliant with OpenFlow 1.3.0 and not newer, as starting with 1.3.1 after that the message is broken too.

Funny, I recently bought a HUAWEI smartphone that had trouble with SmartWatches. The seller told me that most smartwatches worked with every phones except Huawei ones, because their bluetooth implementation is not compliant. Seems to be a habit…

PROXIMUS_AUTO_FON automatic connexion on linux using wpa_supplicant

If you understand this title, you don’t need more explanation :

/etc/network/interfaces
auto wlan1
iface wlan1 inet dhcp
wpa-conf /etc/wpa_supplicant/wpa_supplicant.conf

/etc/wpa_supplicant/wpa_supplicant.conf
ctrl_interface=/var/run/wpa_supplicant

network={
ssid="PROXIMUS_AUTO_FON"
scan_ssid=1
key_mgmt=WPA-EAP
eap=TTLS
identity="LOGIN@proximusfon.be"
password="PASS1234"
phase2="auth=MSCHAPV2"
}

Some may ask why some people would want to do that… I’m now using Voo, but I use my parent’s FON login when voo crash. My current project is towards aggregating the two links by load balancing, or at least have some kind of automatic failover. The more interesting part would be to switch to “FON only” when I reach my 100Gb limit…

Proximus BBOX 3 in bridge mode with prefix delegation on Linux

Using bridge mode allows you to get a public IP address on one computer (which can serve as a router) behind your modem. This allows you to know your public IP address without using a third-party service, and control more finely all your routing parameters inside your own Linux-based router (this tutorial) or a better router than the BBOX’s one.

We’ll call “the router” the device you want to use behind the modem for clarity.

The bridge mode of the Proximus BBOX 3 is quite interesting. You connect normally to your BBOX using DHCP and will get a locally routable address (i.e. 192.168.0.0/24), but you can use PPP over Ethernet (PPPoE) to get a virtual interface inside your router. This virtual “ppp” interface will have a public IP address, and packets will flow IN and OUT the internet through that interface.

Proximus allows you to therefore maintain 2 PPP connections, one established by the BBOX (also used for the TV), and the other inside your router. It also means your home gets 2 IPv4 addresses.

I prefer that mode to the VOO one, where the external IP address is given by DHCP to only one host in the LAN, the first device to connect to the router using DHCP (dangerous and prone to configuration errors...). Same and independently for IPv6 using DHCPv6. While Proximus not only gives you an IPv6 address but also a /64 prefix via PPPoE to get a direct connection without using a crappy NAT to all your PCs. For IPv6, Proximus is much simpler than setting up an independent DHCPv6 client which gives back the v6 prefix to your LAN side. The second downside is that VOO must use ugly hacks to allow connection to the box as there is no "modem internal network" anymore. You can access your modem at the normally-illegal 192.168.100.1 address as this is on the "public web" space from the router perspective. Moreover, it seems that the modem stops responding to DHCP requests from time to time, losing connectivity... VOO bridge mode is definitively not good... But this may be a temporary bug. I did not observe this anymore...

The bridge/WAN part

Edit /etc/network/interfaces to add the following lines , assuming that eth0 is the interface used to connect to your BBOX.

auto dsl-provider
 iface dsl-provider inet ppp
 pre-up /bin/ip link set eth0 up
 provider dsl-provider

Install pppoe with sudo apt-get install pppoe on ubuntu/debian or sudo yum install pppoe centos/fedora

Then create a file named /etc/ppp/peers/dsl-provider and add the following lines :

noipdefault
defaultroute
replacedefaultroute
hide-password
noauth
persist
mtu 1492
plugin rp-pppoe.so eth0
user "fc0123456@skynet"
usepeerdns

Then edit the file /etc/ppp/chap-secrets and add the line :
"fc012345@skynet" * "password"

If you lost your skynet credentials (personally, I just never received them), you can change them online on MyProximus. You’ll have to reboot your modem so it receives automatically the new credentials.

And that’s all, you can reboot or do a sudo pon dsl-provider and you’ll have a new interface with a public IPv4 and a /64 IPv6.

The router/LAN part

To give connectivity in IPv4 for your hosts and use your Linux host as a router, you’ll have to do a NAT. But you can delegate your IPv6 range and give public IPv6 addresses to all your PCs using SLAAC! Remember to also install a firewall…

To do so, install radvd and add in /etc/radvd.conf (if br0 is the interface connected to your internal network) :

interface br0

{
 AdvSendAdvert on;
 prefix ::/64
 {
   AdvOnLink on;
   AdvAutonomous on;
   AdvRouterAddr on;
 };
 RDNSS 2001:4860:4860::8888 2001:4860:4860::8844
 {
   # AdvRDNSSLifetime 3600;
 };
};

Then do a sudo radvd restart and that’s it.

The RDNSS line gives the address of Google’s public DNS to your host. We could use Proximus’ one, but I don’t have the address on hand.

Do not hesitate to contact me!

Enable Wifi N access point with hostapd

I use an odroid (a rasberry-pi like mini-pc but more powerfull) as a Wifi access point for my smartphone and my camera since quite a long time. I forgot that my USB Wifi dongle was compatible with Wifi N (only on 2.4Ghz), so my hostapd config file was :

[code]interface=wlan3
ssid=Barbette-Chambre
hw_mode=g
channel=11
bridge=br0
wpa=2
wpa_passphrase=YOURPASSPHRASE
wpa_key_mgmt=WPA-PSK
wpa_pairwise=CCMP
rsn_pairwise=CCMP
wpa_ptk_rekey=600[/code]

Here is the speed result with iperf :

[ 4] local 10.0.0.44 port 5001 connected with 10.0.0.175 port 48727
[ ID] Interval Transfer Bandwidth
[ 4] 0.0-10.2 sec 18.4 MBytes 15.1 Mbits/sec

Normaly, this should be 56Mbits/s, but we know wifi is crap…

And to enable Wifi N :

[code]

interface=wlan3
ssid=Barbette-Chambre
hw_mode=g   #Yes, this is not an error. Wifi N builds on top of G 😉
channel=11
bridge=br0
ieee80211n=1
wmm_enabled=1
country_code=BE
ht_capab=[HT20][HT40][SHORT-GI-20][SHORT-GI-40]
ieee80211d=1
wpa=2
wpa_passphrase=YOURPASSPHRASE
wpa_key_mgmt=WPA-PSK
wpa_pairwise=CCMP
rsn_pairwise=CCMP
wpa_ptk_rekey=600[/code]


And the speed result is now :

[ 4] local 10.0.0.44 port 5001 connected with 10.0.0.175 port 48754
[ 4] 0.0-10.1 sec 30.6 MBytes 25.4 Mbits/sec

Better, but still not the 150Mbits/s of wifi N… But it’s better !

Making Tilera TileMDE work on Debian 7 with Kernel 3.14

This review how to install Tilera MDE, with the slight modifications to support recent kernel and the debian environment. Our device is a TILEncore-Gx36

Edit : with MDE 4.3.2, the patch isn’t necessary anymore. You may use ./tilera-compile –gpl-license to be able to go through compilation

Install & Unpack

  • cd /opt/
  • Extract the primary tareball with sudo tar -xvf /home/tom/TileraMDE-4.3.0.178115_tilegx.tar
  • Run “unpack”  sudo ./TileraMDE-4.3.0.178115/tilegx/unpack
  • (optional instead of the last point) unpack the full tarball with sudo ./TileraMDE-4.3.0.178115/tilegx/unpack /PATH_TO/TileraMDE-4.3.0.178115_tilegx_tile_full.tar.xz
  • We’ll keep the Tilera MDE’s root on /opt/tilera, so move it there with sudo mv ./TileraMDE-4.3.0.178115/tilegx/ /opt/tilera && cd /opt/tilera

Setup environment

You’ve got to setup some environment variables. One way to do it is to add at the bottom of your ~/.bashrc file :

TILERA_ROOT=”/opt/tilera”;
PATH=”/opt/tilera/bin:$PATH”
export TILERA_ROOT PATH;

Compile and fail…

You’ve got to compile the Tilera module :

  • cd /opt/tilera/lib/modules/
  • Normally you would do “./tilepci-compile  –tilera-license”
  • Then “./tilepci intall”

But that would fail because :

  • It rely on redhat tools like chkconfig
  • It will compile a module not compatible with kernel 3.0+

You can do it anyway to extract a new folder for your current kernel, in my case “3.14-2-amd64-x86_64”

Apply the patch

So we’ll use my updated version of Sylvain Martin’s patch available here ( tom-fixes-3.14 ):

Warning : The patch is untested for many features (mostly related to /proc), but works with the stantard things you’ll want to do… Access the tilera, use tile-monitor, … It’s provided without any warranty.

  • rm -rf 3.14-2-amd64-x86_64
  • cp -rf tilera_src 3.14-2-amd64-x86_64
  • cd 3.14-2-amd64-x86_64/pcie
  • Apply the patch with patch -p1 < /PATH_TO/tom-fixes-3.14.txt
  • make INSTALL_PATH=/opt/tilera/lib/modules/3.14-2-amd64-x86_64

Install

tilepci-install will want “chkconfig” which is a redhat tool. I provide a simple wrapper here : https://github.com/tbarbette/chkconfigwrapper/blob/master/chkconfig , you just have to copy it in /usr/sbin/ and launch ./tilepci-install


If you have any comment or can provide any help, do not hesitate to comment !

Home server : auto-shutdown if no other computers are running

I wanted to shutdown my linux home media server if there is no running computer on my network. So I wrote this little programs which reads all known ips from DHCP configuration and lease files and send a ping to them. If the ping respond, one PC of my LAN is up… To re-start the computer in the morning, I use the BIOS RTC alarm (the thing you have by pressing F1 or ESC on reboot). You could also add a script/a program on each of your computers to send the magic packet to your home server to wake it by lan (see “wake on lan” on google). This script can take any command. But if you want to do shutdown like proposed in the title, you can use : [code]sudo ./autoshut “poweroff” 10.0.0.1[/code] Where 10.0.0.1 is your local IP adress. To compile the program, simply use (after saving the code as “autoshut.c”) : [code]gcc -o autoshut autoshut.c[/code] In my case, I wanted to launch the command only after midnight, so I used cron. Cron will launch that command every 5 minutes from midnight to eight o’clock. So if I stay up late, my server won’t shutdown if my own computer is not down too. That’s the whole purpose. The line in my crontab : [code]0,10,20,30,40,50 1,2,3,4,5,6,7 * * * root /home/tom/autoshut/autoshut “poweroff” 10.0.0.1[/code] Why do all that ? Energy consumption… [code]#include <stdio.h> #include <stdlib.h> #include <regex.h> #include <string.h> #define LEASE_FILE “/var/lib/dhcp/dhcpd.leases” #define DHCP_CONFIG_FILE “/etc/dhcp/dhcpd.conf” int in_array(char** ar, char* str) { int i = 0; while (ar[i] != NULL) { if (strcmp(ar[i],str) == 0) return 1; i++; } return 0; } char* extractIP (char* filename, char** list, int* listNum) { FILE *pfile; pfile = fopen(filename, “rb”); if(pfile == NULL){ printf(“Sorry, can’t open %s\n”, filename); return ‘\0’; } regex_t reg; int err = regcomp (&reg, “(10\\.[0-1]\\.0\\.([1-9]|[0-9]{2,3}))”, REG_EXTENDED); if (err != 0) { printf(“ERREUR\n”); return ‘\0’; } char ligne[255]; while(!feof(pfile)) { fgets(ligne, 254 ,pfile); int match; size_t nmatch = 0; regmatch_t *pmatch = NULL; nmatch = reg.re_nsub; pmatch = malloc (sizeof (*pmatch) * nmatch); match = regexec (&reg, ligne, nmatch, pmatch, 0); if (match == 0) { char *ip = NULL; int start = pmatch->rm_so; int end = pmatch->rm_eo; size_t size = end – start; char* str = malloc(sizeof(char) * 15); strncpy (str, &ligne[start], size); str[size] = ‘\0’; if (!in_array(list, str)) { list[*listNum] = str; printf(“%s\n”, str); (*listNum)++; } } } fclose(pfile); regfree(&reg); } int ping(char* address) { char cmd[30] = “ping -W 1 -q -c 1 “; strcat(cmd,address); int ret=system(cmd); printf(“\nResultat : %d\n\n”,ret); return !ret; } /* TODO : maybe an option? int checkCableStatus(const char* interface) { /sys/class/net/eth0/carrier }*/ int main(int argc, char** argv) { if (argc <= 2) { printf(“Usage : %s Command Local-IP [Local-IP-2]\n\tCommand : a command to execute if ping does not work\n\tLocal-IP : Ip to ignore\n\tLocal-IP-2 : Optional second ip to ignore”,argv[0]); return -1; } int listNum = 0; char** list = malloc(sizeof(char*) * 255); extractIP(DHCP_CONFIG_FILE, list, &listNum); extractIP(LEASE_FILE, list, &listNum); int i = 0; while (list[i] != NULL) { if (strcmp(list[i],argv[2])!=0 && (argc==3 ||strcmp(list[i],argv[3])!=0)) { if (ping (list[i])) { printf(“%s responded. Command aborted !\n”,list[i]); return EXIT_SUCCESS; } } i++; } system(argv[1]); return EXIT_SUCCESS; }[/code]

Manual network configuration under ubuntu

This procedure is only with cable, not for wifi

First check that your interface is up with the command “sudo ifconfig” :

lo
If like in this screenshot you do not see an interface named “ethXXX“, you have to start the interface manually.
 
To found which of eth0, eth1, … your network card is, you can type “dmesg | grep eth

dmesg
We see here that the card “Intel Pro/1000” takes the “eth0” interface name. But it’s later renamed to “eth1“.
 
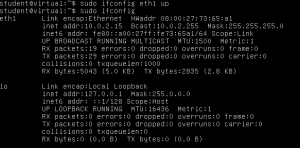
So our interface here is eth1, to bring it up, simply run “sudo ifconfig eth1 up”.
eth1up

You may not have an IP Adress automatically like in this screenshot. If it’s the case, simply type “sudo dhclient eth1” to get one with DHCP.
 
If it doesn’t work, try to directly ping an IP address like google’s dns server 8.8.8.8 with the command “ping 8.8.8.8“. If it works, you probably have a nameserver problem. Simply add the line “nameserver 8.8.8.8” in /etc/resolv.conf